
Here is my pattern, it is very simple.
 |
| From Fall Family Pics |
How I came up with it was, I folded a 12x12 scrap book paper in half making it 6x12. Then I traced out my doll shape. A oval head with fat hands and feet. :)
 |
| From Fall Family Pics |
I love doing patterns like this because then I know both sides are exactly the same! After unfolding my doll came out to be 11in.x 7in. Which is a great size for little ones to handle :)
 |
| From Fall Family Pics |
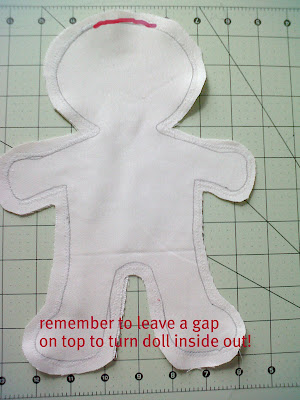
Next I folded my skin colored fabric in half and traced my doll pattern.
 |
| From Fall Family Pics |
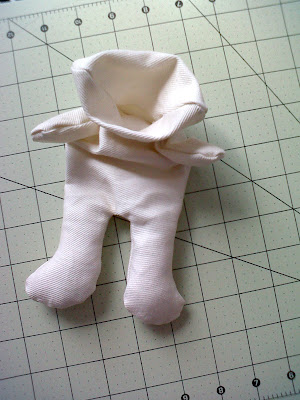
I like to save time by cutting both sides out together. I left about a 1/2 inch seam allowance, I did a zig zag stitch right over my traced line. I left a 2 1/2 in. to 3 in gap at the top of the head to turn it inside out, like a pillow.
 |
| From Fall Family Pics |
 |
| From Fall Family Pics |
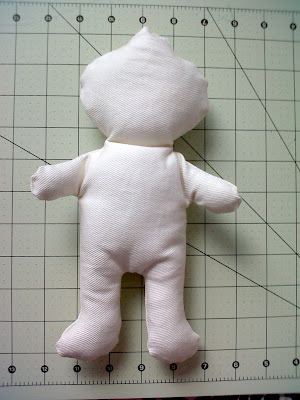
Once you are happy with how full and plush the doll is you just sew the top shut.
 |
| From Fall Family Pics |
Trim the excess and your little guy or girl is ready for hair!!!
 |
| From Fall Family Pics |
Here is my favorite part, customizing it to look just like your little cutie! I used felt for the hair since it doesn't fray! I also stitched hair strands in a dark color to add a little more interest. Sew the hair like a hat with a seam running down the sides of the head. turn inside out and hot glue it to the top of the head. I also like to put a few stitches it, just so I know it isn't going anywhere.
To make this hair style I started with cutting out the shape of the hair sewing around the top and side edges. Next I turned it inside out and cut out the face opening and bangs. I wish I would of took pictures of this process, but I was doing a different hair style for each doll, so I didn't make any patterns.
 |
| From Fall Family Pics |
 |
| From Fall Family Pics |
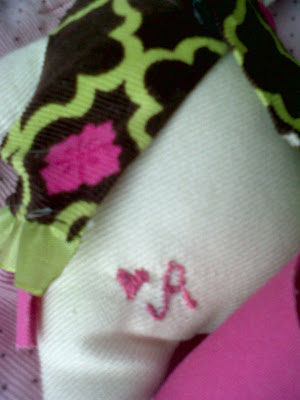
It is all about details and the amount of time you are willing to spend on these dolls. I even added a little A to the backside of Abigail's doll. Just little things like that make them even more special!
 |
| From Fall Family Pics |
Here is a whole group of dolls I made for a friend! :D
 |
| From Fall Family Pics |
I hope you enjoy using this pattern and remember to HAVE FUN WITH IT!!!
Thanks for stopping by,
Jeni
These are adorable! Thank you for the tutorial!
ReplyDeleteConnie
OMG!!! So adorable. You make it look so simple. I think this would make the perfect Christmas
ReplyDeletepresent for my girls.
Jamie
http://diyhshp.blogspot.com/
Those dolls are awesome! This is a tutorial I most definitely will try. It sounds easy enough and the results are so cute! I have a two year old daughter who would be just thrilled if I made her one! Thanks!
ReplyDeleteI LOVE IT! Definitely going to use this tutorial.
ReplyDeleteI am also one of your newest followers!
If you get a chance sometime, you'll have to stop by my blog.
Melissa
redflycreations.blogspot.com
These dolls are too cute! I'm currently learning how to sew, so maybe I might try to make one of these in the near future. :)
ReplyDelete~M. Wildflower
-Visiting from Domestic Divine Link-up. :)
Wow, amazing job! Super cute dolls, I'm pinning this to try myself one day.
ReplyDeleteYour dolls are so cute and you did an amazing job customizing them!
ReplyDeleteI'm new to your blog : ) stop by and visit sometime soon!
Those are so cute!! Makes me want to learn to sew! :)
ReplyDeleteThanks for sharing, the dolls are great!
ReplyDeleteGreeting from Holland,
You are AMAZING once again! I love it. :)
ReplyDeleteThis is a GREAT idea and tutorial! Thanks.
ReplyDeleteSo stinking adorable!! I've been trying to figure this out for months. Thank you.
ReplyDeleteDarling little rag dolls! My girls would love them! So glad you linked up with us at Show & Share!
ReplyDeleteMarie
mylilpinkpocket.blogspot.com
I love it! What fun cuddly dolls!
ReplyDeleteFabulous!! Thank you so much. Perfect for Christmas.
ReplyDeleteSuper sweet! Thanks for sharing! And for linky to the link parties, how I found you! :)
ReplyDeleteThis is supercute! I have to try it one time!
ReplyDeletethanks for the tutorial! i love rag dolls...looks so dang cute!
ReplyDeleteThese are really cute...thanks for the doll tutorial...gonna make some for my daughter and nieces. Would love it if you would link this up to our Rockin' link party going on now at RoCa and Company. Here is the link: http://rocaandcompany.blogspot.com/2011/11/you-rock-8.html. Come and show off what you got. Hope to see you there...
ReplyDeleteRemember...YOU ROCK!!
Carmen @ RoCa and Company
www.rocaandcompany.blogspot.com
Can't wait to make a sweet little doll! Thanks for sharing and great tutorial!
ReplyDeleteHappy weekend!
Carly
They are so cute! Thank you for sharing!
ReplyDeleteYou make it seem so easy to make patterns. Thank you so much for sharing this doll with us. PJ Taylor
ReplyDeleteThese are very cute dolls. What do they look like from the back? How is the hair attached? I think I may have missed something in the explanation.
ReplyDeleteThanks!
Heather,
ReplyDeleteSo sorry I didn't get very good picutres of the hair being add on. I used hot glue to keep it in place, then I just placed a few stitches around the head to make sure it wasn't going anywhere. I made my hair like a hat, so the back of the head is completely covered. I didn't even think of taking pictures from the back! I will have to remember that when I make my next one. :) Hope this helps.
Jeni@ Becoming Martha
@heather
ReplyDeleteGlad you asked! I was wondering about the hair also!
So sweet!
ReplyDeleteGosh I tired cutting out the pattern and it turned instead it looked like a frog. Is there anyway you could provide a pattern on line for those who are really awful at drawing ? :)
ReplyDeleteYes a pattern would be awesome! :D
ReplyDeleteso great
ReplyDelete:)
Love this! I'm new to sewing and fabrics, what type of material did you use for the doll's body?
ReplyDeleteLadies,
ReplyDeleteI am so sorry but I have no idea how to turn my pattern into a file you can download and print. If anyone can tell me how I would gladly post one :) Also I used a thick canvas material for the doll's body. That way it is good and study! Hope this helps...
Jeni Ream
@Becoming Martha
i love the dolls you made
ReplyDeleteLove this, do ya have the pattern?:)
ReplyDeleteHi hun, just wanted to let you know that I featured this on my blog today. I think it is sooo cute!! I would love it if you could check it out and maybe grab my button :)
ReplyDeletehttp://mammymade.blogspot.com/2012/08/mint-stuff-ive-seen-20.html
- Adele @ Mammy Made
I'm having a hard time visualizing the hair process. Any pointers on that step for me? I want to try this out but just can't get past how to do the hair.
ReplyDeleteThanks!
<3 <3 <3 that there are little boy dolls!
ReplyDeleteI am trying to make a doll for my daughter and this is maybe the best way to do it. I need to go do this doll. My daughter will love it. she will play with it. she likes to stay under a table with a blanket over top of it but this will really keep her out. She will love this. Thanks for posting this.
ReplyDeleteDo you have an actual pattern for this doll? I want to make some and give to a friend to donate to the hospital where she gave birth to her beautiful daughter that died at birth.
ReplyDeleteThis is really cute - do you sell the pattern?
ReplyDeleteMy son wanted to make a doll for his sister. He is 11 and she is 2. All of the patterns I had were to difficult for him but I think he can do this one. Great instructions. If I decide to bloc his process I will link back to you. Thanks
ReplyDeleteJust love the cute little dolls. I am hoping to make some for little girls around the world.
ReplyDeleteGail
heartandsowdesigns.blogspot.com
Thank you for this. I'm going to do it but will have to modify a little and have the parts removable for therapy identification.
ReplyDeleteThanks for sharing! I just signed up to start a group to make items for a place that provides clothing, toys, food ... to those less fortunate. This will be quick and easy to make for the little girls. :)
ReplyDeleteI so love this idea! Very cool and precious! Love your pattern also, very easy to make! Thankyou for sharing! These stuffies excite me, especially because they are sort of personalized! I featured this in my blog: http://www.plushiepatterns.com/ragdoll-tutorial-by-becoming-martha/
ReplyDeletelovely
ReplyDeleteIf you insert a squeaky toy or two in the body of the doll (and make the stuffing non-toxic, even rags) you have a perfect toy for your doggie.
ReplyDeleteWow! Adorable and cute little dolls, thank you very much for this tutorial. I am making this doll tonight :) Your pattern is simple and easy, also excellent !!!
ReplyDeleteI'm so happy to have found your post. I've been looking for a doll pattern to make some for the Samaritan's Purse at Christmas time. Thanks again!
ReplyDeletehow do I figure the doll dimensions? not good at this. how do I transfer to the right size on paper?
ReplyDeleteVery good stuff with good ideas and concepts, lots of great information and inspiration, both of which we all need, Jupiter Island Tutoring helpful information.
ReplyDeleteGood information here. I really enjoy reading them every day. I've learned a lot from them.Aventura Tutoring Thanks so much for sharing this information. Greatly help me being a newbie.
ReplyDeleteI’ve desired to post about something similar to this on one of my blogs and this has given me an idea. Palm Beach Tutoring Cool Mat.
ReplyDeleteWhere are the patterns for the clothes?
ReplyDeleteWhat a great web blog . I like this blog because of its design and interface. Private tutor Larchmont It is user friendly and it is nice to visit the blog.
ReplyDeleteThank you for posting this.Private tutor Greenwich You most absolutely have built this blog website into something special.
ReplyDeleteThis is very nice blog because information provided here through the article and the pictures are very effective. Private tutor Sag Harbor Because sometimes words cannot explain the things that pictures can and here the words and pictures both are expressing the things in balance.
ReplyDeleteI get incredible information in your blog. I like your designs.
ReplyDeleteThank you for this detailed information!
ReplyDeleteVery Nice Blog Post for More Information"If you have a baby girl, then we are sure she loves the baby alive doll, porcelain dolls! Gift here the barbie dolls now.Baby Alive Doll
ReplyDeleteVery Nice Blog Post for More Information"Looking for soft baby dolls for infants? Check out the huge collection of a soft baby dollPremium quality Free shipping, Cash On Delivery, Easy returns.Baby Doll
ReplyDeleteVery Nice Blog Post for More Information"Buy Rag doll Red At best from the baby store Premium quality Free shipping, Cash On Delivery, Easy returns.Rag doll Red
ReplyDeleteVery Nice Blog Post for More Information"Looking for the doll soft toy online shop, to purchase a good quality barbie doll soft toy? Check out the doll soft toy online now.Premium quality Free shipping, Cash On Delivery, Easy returns.Doll Soft Toy Online
ReplyDeleteVery Nice Blog Post for More Information"Soft and Attractive Cute Looking Rag Baby Doll for Girls, to purchase a good quality barbie doll soft toy? Check out the doll soft toy online now.Premium quality Free shipping, Cash On Delivery, Easy returns.Rag Doll Kitten
ReplyDeleteVery Nice Blog Post for More Information"We have a massive collection of soft toy doll images, Cinderella soft toy doll, princess soft toy doll available with us. Grab now. Premium quality Free shipping, Cash On Delivery, Easy returns.Soft Toy Doll Images
ReplyDeleteVery Nice Blog Post for More Information"Get your hands on the ultra-cute doll stuffed toy, Dora soft toy doll, and an anna soft toy doll for your little princess. Premium quality Free shipping, Cash On Delivery, Easy returns.Doll Stuffed Toy
ReplyDeleteVery Nice Blog Post for More Information"The best birthday gift for your little one could be the soft baby dolls for toddlers. Grab these ultra-soft dolls for toddlers and make their day.Soft Baby Dolls For Toddlers
ReplyDeleteVery Nice Blog Post for More Information"Grab the soft doll for a baby girl now. These washable baby dolls and soft fairy dolls are all you need for your little one.Soft Doll For Baby Girl
ReplyDeleteVery Nice Blog Post for More Information"Looking for a soft baby doll for a 1-year-old? Put a full stop to your search and check out my little pony soft toy.Soft Baby Doll For 1 Year Old
ReplyDeleteGood entry!
ReplyDeleteVery informative post. Covered almost everything. Please keep sharing such useful content with us.
Do you want to buy high-quality sex dolls at an affordable rate in the USA, if yes, then you should visit Honeysexdolls.com, which is the most trusted online shop for buying all types of sex dolls at a low rate. By vetting and authenticating each brand of doll, we can guarantee 100% customer satisfaction. With our expert team of trained and friendly agents, we’re here to walk you through, every step of the way.
Realistic sex dolls
Curvy sex dolls
Japanese sex dolls
Nice Post!
ReplyDeleteCheap sex dolls add huge excitement to your sex life, whether you choose to use them alone, or with another person or people, but better of all they will be used to fulfill all sexual wants, needs and fantasies.
Excellent information provided by you through this post. I follow all the mentioned information. As we all know Dolls are some of the oldest toys that children have ever played with. baby dolls are packed with potential for teaching children about themselves and the world around them. Playing with dolls is useful in developing your child’s sense of grooming and hygiene. If you want to buy baby girl doll toys for your babies, then you can visit us at: babymajesty.store
ReplyDeleteNice blog, thanks for sharing
ReplyDeleteBuy Cheap Sex Dolls in the USA at the most affordable price. We offer the best selection of affordable and high-quality sex dolls at the most affordable price. Explore now for more info.
Thanks for the interesting article regarding sex dolls ,we also have great content which can pay meaningful contribution to your audience at hotties sex dolls.for more informationsbuy sex dolls online.
ReplyDeleteemail...support@hottiesexdolls.com
call/text+1(505)257-5355
ReplyDelete
Hello Very Nice your Blog and Keep Update for more information aboutDoll Soft Toy Online
ReplyDeleteHello Very Nice your Blog and Keep Update for more information aboutRag Doll Kitten
ReplyDeleteHello Very Nice your Blog and Keep Update for more information about Car Coating India, Ceramic Car Coating, Ceramic Coating PriceCar Coating India
ReplyDeleteHello Very Nice your Blog and Keep Update for more information about Onyxaa provides Car Wash Franchise IndiaCar Wash Franchise India
ReplyDeleteHello Very Nice your Blog and Keep Update for more information about Mustard Monkey 25 cm Buy At best from the baby. Mustard Monkey 25 cm
ReplyDeleteHello Very Nice your Blog and Keep Update for more information about Does your baby like tiger soft toy? Gift him or her a tiger teddy bear. Tiger Soft Toy
ReplyDeleteHello Very Nice your Blog and Keep Update for more information about ho does not like octopus? Give your little one an octopus soft toy or a baby octopus stuff toy. Octopus Soft Toy
ReplyDeleteHello Very Nice your Blog and Keep Update for more information about Buy Soft Toy Octopus Set Of Two. Stuffed Octopus Set Of Two
ReplyDeleteThanks for sharing this post with us.Wikivela
ReplyDeleteHello Very Nice your Blog and Keep Update for more information about The best birthday gift for your little one could be the soft baby dolls for toddlers. Grab these ultra-soft dolls for toddlers and make their day.>Soft Baby Dolls For Toddlers
ReplyDeleteHello Very Nice your Blog and Keep Update for more information about Looking for a soft baby doll for a 1-year-old? Put a full stop to your search and check out my little pony soft toy.>Soft Baby Doll For 1 Year Old
ReplyDeleteNice blog, Thanks for sharing.
ReplyDeleteGet your favorite cheap realistic sex dolls here at JS Dolls Choose from our store beautiful and top quality real sex doll giving a great fantasy.
Консоли от корпорации Microsoft не сразу завоевали всемирную известность и доверие игроков. 1-ая консоль под названием Xbox, вышедшая в далеком 2001 году, значительно уступала PlayStation 2 по количеству проданных приставок. Но все изменилось с выходом Xbox 360 - консоли седьмого поколения, которая стала по-настоящему "народной" для жителей Рф и государств СНГ - http://ru-xbox.ru/load/8. Веб-сайт Ru-Xbox.Ru является пользующимся популярностью ресурсом в числе поклонников приставки, поскольку он предлагает игры для Xbox 360, которые поддерживают все имеющиеся версии прошивок - совсем бесплатно! Для чего играть на оригинальном железе, в случае если имеется эмуляторы? Для Xbox 360 игры выходили долгое время и находятся как посредственными проектами, так и хитами, многие из которых даже сегодня остаются уникальными для это консоли. Некоторые гости, желающие сыграть в игры для Xbox 360, могут задать вопрос: для чего нужны игры для прошитых Xbox 360 freeboot либо различными версиями LT, в случае если имеется эмулятор? Рабочий эмулятор Xbox 360 хоть и существует, однако он просит производительного ПК, для покупки которого будет нужно вложить существенную сумму. К тому же, различные артефакты в виде исчезающих текстур, отсутствия некоторых графических эффектов и освещения - смогут значительно испортить впечатления об игре и отбить желание для ее предстоящего прохождения. Что предлагает этот портал? Наш портал на сто процентов посвящен играм для приставки Xbox 360. У нас можно совершенно бесплатно и без регистрации скачать игры на Xbox 360 через торрент для следующих версий прошивок консоли: - FreeBoot; - LT 3.0; - LT 2.0; - LT 1.9. Каждая прошивка имеет свои особенности обхода интегрированной защиты. Поэтому, для запуска той либо другой игры будет нужно загрузить специальную ее версию, которая вполне приспособлена под одну из четырех вышеперечисленных прошивок. На нашем портале можно без усилий получить желаемый проект под подходящую прошивку, поскольку возле каждой игры находится название версии (FreeBoot, LT 3.0/2.0/1.9), под которую она приспособлена. Гостям данного ресурса доступна особая категория игр для 360-го, предназначенных для Kinect - специального дополнения, которое считывает все движения одного либо нескольких игроков, и позволяет управлять с их помощью компьютерными персонажами. Большой выбор ПО Кроме возможности скачать игры на Xbox 360 Freeboot или LT различных версий, тут вы можете получить программное обеспечение для консоли от Майкрософт: - разнообразные версии Dashboard, которые позволяют кастомизировать интерфейс консоли под свои нужды, сделав его более удобным и нынешним; - браузеры; - просмотрщики файлов; - сохранения для игр; - темы для консоли; - программы, для конвертации образов и записи их на диск. Помимо вышеперечисленного игры на Xbox 360 Freeboot можно запускать не с дисковых, а с USB и многих других носителей, используя программу x360key, которую можно достать на нашем сайте. Посетителям доступно огромное количество полезных статей, а помимо этого форум, где можно пообщаться с единомышленниками или попросить совета у более опытных владельцев консоли.
ReplyDelete中価格帯と高価格帯の人形はどちらもより専門的になるため、一般的なハイストリートショップでは見つけることができません。ラブドール これらの人形を購入するときは、品質を確認する必要があります。信頼できるオンライン風俗店を利用して、コンドームなどの他の性的製品を提供し、ダッチワイフや個人的な性生活を支援します。
ReplyDeleteGreat Post!!
ReplyDeleteThanks for sharing this wonderful post with us. This is more helpful and useful for find the best and unique quality of cheap sex dolls in the United States Country. Also, these cheap sex dolls fulfills your needs.
Great Post!!
ReplyDeleteThanks for sharing this wonderful post with us. This is more helpful for find the best and unique quality of anime sex dolls in the United States Country. These sex dolls are more beneficial for every customer who really needs this one. These sex dolls gives to you happiness and pleasures.
Great Post!!
ReplyDeleteThanks for sharing this wonderful post with us. This is more helpful and useful for find the best and unique quality of cheap sex dolls in the United States Country. Also, these cheap sex doll fulfills every customer needs and demands. These cheap sex doll gives to you happiness and pleasures.
Great Post!!
ReplyDeleteThanks for sharing this wonderful post with us. This is more helpful and useful for find the best quality anime sex doll in the United States Country.
Soft Baer Anxiety Relief - for Children with Special Needs - Plush Weighted Stuffed Animal
ReplyDeleteAnkara
ReplyDeleteVan
Hakkari
Edirne
Yozgat
S5JO
van
ReplyDeletekastamonu
elazığ
tokat
sakarya
WSOX3Y
I am hoping to view the same high-grade blog posts from you later on as well.
ReplyDelete
ReplyDeleteYou’ve written nice post, I am gonna bookmark this page, thanks for info.
Hi very nice blog!! Man ..
ReplyDeletesakarya
ReplyDeletedüzce
çankırı
sivas
elazığ
OF4CB
görüntülü show
ReplyDeleteücretlishow
ZU2
https://titandijital.com.tr/
ReplyDeletesakarya parça eşya taşıma
aksaray parça eşya taşıma
urfa parça eşya taşıma
kocaeli parça eşya taşıma
PLES
ankara parça eşya taşıma
ReplyDeletetakipçi satın al
antalya rent a car
antalya rent a car
ankara parça eşya taşıma
TJKWDG
Tokat Lojistik
ReplyDeleteKonya Lojistik
Mersin Lojistik
Karabük Lojistik
Samsun Lojistik
8OSKR
I’m glad to read this article. The website style is perfect
ReplyDeleteThank you for posting something good like this
ReplyDeleteSuch a nice article. Its useful for us. Thanks a lot
ReplyDeleteIt was definitely informative article you've done.
ReplyDeleteHi! I like to give you a huge thumbs up for the great info
ReplyDeleteYou provide the correct information here I really bookmark it
ReplyDelete
ReplyDeleteYour views are in accordance with my own for the most part.
This is great content for your readers. Feel free to visit my website;
ReplyDeleteThank you for sharing great information to us Feel free to visit my website;
ReplyDelete
ReplyDeleteI really appreciate this post.
Thankyou appropriate for keeping us informed.
ReplyDeleteThis is great to unleash and play.
ReplyDeleteE27FC
ReplyDeleteÇankaya Boya Ustası
Batman Parça Eşya Taşıma
Zonguldak Şehirler Arası Nakliyat
Tekirdağ Fayans Ustası
Antep Parça Eşya Taşıma
Çerkezköy Televizyon Tamircisi
Nevşehir Lojistik
Batıkent Parke Ustası
Düzce Parça Eşya Taşıma
76998
ReplyDeleteOrdu Parça Eşya Taşıma
Muş Evden Eve Nakliyat
Gümüşhane Şehirler Arası Nakliyat
Giresun Şehirler Arası Nakliyat
Ünye Oto Elektrik
Btcturk Güvenilir mi
Ünye Çatı Ustası
Adıyaman Evden Eve Nakliyat
Erzincan Şehirler Arası Nakliyat
80EDE
ReplyDeleteBtcturk Güvenilir mi
Hatay Evden Eve Nakliyat
Çerkezköy Çatı Ustası
Osmaniye Lojistik
Kars Parça Eşya Taşıma
Bartın Lojistik
Antalya Parça Eşya Taşıma
Bingöl Evden Eve Nakliyat
Burdur Şehirler Arası Nakliyat
I really love it. It's so good and so awesome article. I am just amazed.
ReplyDeleteThat’s a brilliant story posted. I'll come back to read some more.
ReplyDeleteIt’s always a pleasure to read this magnificent articles on this site.
ReplyDelete4B83B
ReplyDeleteKripto Para Çıkarma
Bitcoin Oynama
Binance Nasıl Üye Olunur
Mexc Borsası Kimin
Binance Madencilik Nasıl Yapılır
Coin Oynama
Binance Hangi Ülkenin
Coin Madenciliği Nasıl Yapılır
Coin Kazma Siteleri
18D4C
ReplyDeleteücretsiz görüntülü sohbet
Aydın Görüntülü Sohbet Siteleri Ücretsiz
Rize Yabancı Canlı Sohbet
ordu sesli sohbet siteler
Trabzon Sesli Sohbet
malatya sesli sohbet siteler
en iyi ücretsiz görüntülü sohbet siteleri
Edirne Sesli Sohbet Uygulamaları
Samsun Görüntülü Sohbet Siteleri Ücretsiz
AEF7F
ReplyDeleteInstagram Beğeni Satın Al
Binance Sahibi Kim
Kripto Para Üretme Siteleri
Onlyfans Beğeni Satın Al
Binance Ne Zaman Kuruldu
Raca Coin Hangi Borsada
Youtube Beğeni Hilesi
Kripto Para Nasıl Kazılır
Trovo Takipçi Hilesi
79CBF
ReplyDeleteBitcoin Nasıl Alınır
Ergo Coin Hangi Borsada
Mexc Borsası Güvenilir mi
Ön Satış Coin Nasıl Alınır
Yeni Çıkacak Coin Nasıl Alınır
Kripto Para Çıkarma Siteleri
Binance Referans Kodu
Twitter Retweet Hilesi
Arbitrum Coin Hangi Borsada
522A4
ReplyDeleteellipal
satoshi
poocoin
looksrare
shiba
dexscreener
metamask
defilama
arbitrum
6DC5B
ReplyDeletethorchain
DefiLlama
shapeshift
debank
pinksale
satoshivm
uniswap
poocoin
zkswap